Devils Workshop

has been moved to new address

http://www.devilsworkshop.org

Sorry for inconvenience...

Two Peas and Their Pod: August 2009

Monday, August 31, 2009

Recipe for Marshmallow Blondies


I had leftover marshmallows from my S'mores cookies I baked a couple of weeks ago. I didn't want them to get hard and stale, so I looked for a new recipe to try. I came across a recipe for marshmallow blondies on Ingrid's blog.

I am a huge blondie fan. Dorie's chewy chunky blondies are my favorite and I also love my snickerdoodle blondies. But marshmallow blondies? To be honest, they sounded kind of gross, but I was intrigued, so I tried them.

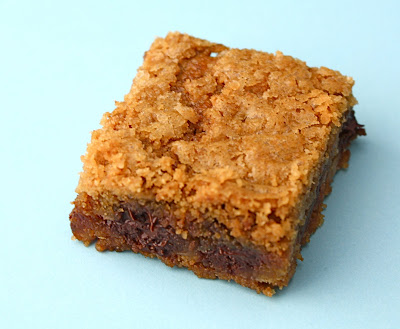
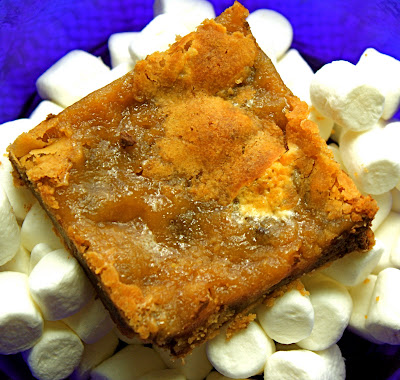
The marshmallows melt into the butterscotch blondie base. Chocolate chips are also included so these babies are super rich! You have to let them cool for awhile after baking so they can set up.

The end result is ooey, gooey, melty marshmallow, chocolaty goodness in your mouth! Cut the squares small because these will take you into sugar overload and I know you will want seconds:)

Also, check out Gaby's, from What's Gaby Cookin, most delicious Marshmallow Muffins! It is marshmallow Monday:)


Marshmallow Blondies
1 cup butterscotch chips
1/2 cup (1 stick) butter
1 1/2 cup all-purpose flour
1 cup brown sugar
2 teaspoons baking powder
1/2 teaspoon salt
1 teaspoon vanilla extract
2 eggs
2 cups mini marshmallows
2 cups semi-sweet chocolate chips

Heat oven to 350 degrees. Grease a 13 x 9 baking dish with cooking spray.

In a sauce pan over medium heat, melt the butterscotch chips and butter, stirring constantly until smooth. When melted remove from heat and transfer the contents of the pan to a mixing bowl. Don't over heat the butter and butterscotch chips or they will separate, so make sure you watch them carefully and don't cook them too long.

Cool the butterscotch and butter mixture to room temperature. In a large bowl, mix the flour, brown sugar, baking powder, salt, vanilla, and eggs into the butter and butterscotch mixture. Make sure you blend everything together really well. The batter will be thick. Mix in the chocolate chips and marshmallows. Spread the blondie batter into the pan.

Bake for 25-30 minutes. The center will feel a little soft, but will firm while cooling. Let cool 2 -3 hours before cutting.

Labels: , ,

Friday, August 28, 2009

Banana Bread with a Cinnamon Sugar Topping


I love bananas, but Josh is not a fan. I buy a bunch with good intentions, but I can never eat them fast enough. I don't really mind though, because when they go brown that means I have an excuse to bake:)

I usually make my banana cinnamon chip cake because everyone loves it, but this time I went back to the old fashion banana bread. Banana bread is a classic, there is just something comforting about it. I love the way it smells up the house and of course I enjoy eating it too!

This is an easy recipe that everyone will love. I added a cinnamon sugar topping to make it a little extra special. If you have friends, family, or neighbors to bake for, don't forget about the good old fashioned banana bread. It is always a winner.

On a side note, my S'mores cookies were featured on Baking Bites this week! Yahoo! Check out the post here.

Enjoy the weekend everyone!


Banana Bread with a Cinnamon Sugar Topping
2 cups all-purpose flour
1 teaspoon baking soda
½ teaspoon baking powder
1 cup granulated sugar
½ cup vegetable oil
2 eggs
3 medium bananas, mashed
1 teaspoon vanilla extract
3 tablespoons milk
Cinnamon and Sugar-for the topping

Preheat oven to 350°F. Grease a 9×5-inch loaf pan. Whisk the flour, baking soda, and baking powder in a small bowl to combine. Set aside.

On medium speed, beat the sugar and vegetable oil to combine. Add the eggs, one at a time, beating after each until combined. Add the mashed bananas and vanilla extract; beat to combine. Alternatively add the flour mixture and milk, beginning and ending with the flour. Beat just until the flour is incorporated and finish mixing with a spatula.

Spread batter into the prepared loaf pan. Sprinkle the cinnamon sugar topping evenly over the batter. Bake until a thin knife inserted in the center comes out almost clean, about 60 minutes.

Cool the cake on a wire rack for for ten minutes. Remove loaf from pan and let cool...or eat it warm. That is the best:)

Labels: , ,

Wednesday, August 26, 2009

Chocolate Chip Oreo Cookie Recipe


Over the weekend Josh’s brother, Ben, and his wife, Whitney, came to visit from California. We spent most of the weekend hanging out with our good friend Lincoln. We lounged by the pool, watched movies, went out for sushi, and had a little bbq.

Of course I made some time for baking. I love baking in the Dewey’s kitchen and Lincoln is one of my best taste testers:) He loves Oreos so I decided to try Picky Palate’s Chocolate Chip Oreo Cookies.

The recipe starts out as a basic chocolate chip cookie, but then you stir in crushed up Oreos. Two cookies in one, a dream come true! They were a hit at the bbq and Lincoln said there was almost a fight for the last cookie!

These cookies are definitely a crowd pleaser and they are Lincoln approved! I recommend you try these soon!

Chocolate Chip Oreo Cookies
Source: Picky Palate

(Printable Recipe)

1 stick softened butter

6 Tablespoons sugar

6 Tablespoons brown sugar

1 egg

½ teaspoon vanilla (I used 1 tsp.)

1 ¼ Cup flour

½ teaspoon baking soda

½ teaspoon salt

10 broken pieces Oreo Cookies

1 cup chocolate chips

Preheat oven to 350 degrees F. Cream butter, and sugars until well combined. Add egg and vanilla until mixed well. Place flour, baking soda and salt into a large bowl, stir to combine. Slowly add dry ingredients to wet ingredients then stir in Oreos and chocolate chips until just combined.

With a medium cookie scoop, scoop onto a parchment or silpat lined baking sheet. Bake for 7-9 minutes (I had to bake mine for 10) or until cooked, but still soft. Let cool on baking sheet for 3 minutes before transferring to cooling rack.

Labels: , ,

Monday, August 24, 2009

White Bean Salad with Zucchini, Green Beans, and Tomatoes


We didn't plant a big garden this year, but our friend has been sharing his garden goods with us. He brought over zucchini and green beans the other day. I made zucchini bread and created a new salad.

I love salads anytime of the year, but especially in the summer when it is hot and the produce is at it's peak. For this salad, I sauted zucchini and green beans in a tiny bit of olive oil. I didn't cook them for long because I wanted them to be crisp. I added white beans-a great source of protein, and tomatoes. I gave the veggies a nice splash of fresh lemon juice. To top things off, I threw in some fresh basil and Parmesan cheese too!


This is one of my new favorite salads. It is super simple, tasty, and good for you!


White Bean Salad with Zucchini, Green Beans, and Tomatoes
1 can cannellini beans (white beans), drained and rinsed
Olive oil

1 zucchini, chopped

1 cup fresh green beans, remove the ends

2-3 tomatoes, chopped

1/2 cup fresh basil leaves, chopped

Juice of one lemon

Parmesan cheese-just guess on the amount

Coarse salt and ground pepper


In a small sauce pan, heat up the olive oil and sauté the zucchini and green beans. Don’t overcook them. You want the vegetables to be crisp.

In a medium bowl, place cannellini beans, zucchini, green beans, tomatoes, basil, lemon juice, and Parmesan cheese; season with salt and pepper. Toss to combine.

Labels: , ,

Friday, August 21, 2009

World Peace Cookies


It is Friday and that means I am still in my pajamas:) I love having Fridays off! Thank you for all of your comments on the S'mores cookies. They are fun to make and eat!

Today I am sharing one of my favorite Dorie recipes-world peace cookies. I am sure many of you have already fell in love with these cookies, but in case you haven't, these are a MUST bake. I made them for the dessert party and they didn't last very long. I also noticed a sense of peace at the party:)

I love these cookies because they can be made in advance. You roll the chocolate dough into logs and can keep them in the refrigerator for three days or in the freezer for a couple of months. The perfect cookie to have on hand for unexpected guests. The chocolate cocoa dough is enhanced by chocolate chunks and fleur de sel. The hint of salt is what takes these cookies to pure pefection. The combination is fantastic. Josh loves a couple of these with a tall glass of milk.

I also made Dorie's Chewy Chunky Blondies for the party-another Dorie favorite. I love these so much I baked them for our dessert station at our wedding. The blondies are buttery, chocolaty, chewy, and addicting! You can find the recipe here.


Happy Friday! I hope you enjoyed my Friday favorites:) Have a splendid weekend!


World Peace Cookies
(Printable Recipe)

Recipe from Dorie Greenspan, Baking From My Home to Yours

1 1/4 cups all-purpose flour
1/3 cup unsweetened cocoa powder
1/2 teaspoon baking soda
1 stick plus 3 tablespoons (11 tablespoons) unsalted butter, at room temperature
2/3 cup (packed) light brown sugar
1/4 cup sugar
1/2 teaspoon fleur de sel or 1/4 teaspoon fine sea salt
1 teaspoon vanilla extract
5 ounces bittersweet chocolate, chopped into chips, or a generous 3/4 cup store-bought mini chocolate chips

Sift the flour, cocoa and baking soda together.
Working with a stand mixer, preferably fitted with a paddle attachment, or with a hand mixer in a large bowl, beat the butter on medium speed until soft and creamy. Add both sugars, the salt and vanilla extract and beat for 2 minutes more.

Turn off the mixer. Pour in the flour, drape a kitchen towel over the stand mixer to protect yourself and your kitchen from flying flour and pulse the mixer at low speed about 5 times, a second or two each time. Take a peek — if there is still a lot of flour on the surface of the dough, pulse a couple of times more; if not, remove the towel.

Continuing at low speed, mix for about 30 seconds more, just until the flour disappears into the dough — for the best texture, work the dough as little as possible once the flour is added, and don’t be concerned if the dough looks a little crumbly. Toss in the chocolate pieces and mix only to incorporate.

Turn the dough out onto a work surface, gather it together and divide it in half. Working with one half at a time, shape the dough into logs that are 1 1/2 inches in diameter. Wrap the logs in plastic wrap and refrigerate them for at least 3 hours. (The dough can be refrigerated for up to 3 days or frozen for up to 2 months. If you’ve frozen the dough, you needn’t defrost it before baking — just slice the logs into cookies and bake the cookies 1 minute longer.)

GETTING READY TO BAKE: Center a rack in the oven and preheat the oven to 325 degrees F. Line two baking sheets with parchment or silicone mats.
Working with a sharp thin knife, slice the logs into rounds that are 1/2 inch thick. (The rounds are likely to crack as you’re cutting them — don’t be concerned, just squeeze the bits back onto each cookie.) Arrange the rounds on the baking sheets, leaving about 1 inch between them.

Bake the cookies one sheet at a time for 12 minutes — they won’t look done, nor will they be firm, but that’s just the way they should be. Transfer the baking sheet to a cooling rack and let the cookies rest until they are only just warm, at which point you can serve them or let them reach room temperature.

SERVING: The cookies can be eaten when they are warm or at room temperature — I prefer them at room temperature, when the textural difference between the crumbly cookie and the chocolate bits is greatest — and are best suited to cold milk or hot coffee.

STORING: Packed airtight, cookies will keep at room temperature for up to 3 days; they can be frozen for up to 2 months.

Labels: , , ,

Monday, August 17, 2009

Recipe for Lemon Verbena Blueberry Scones


Our lemon verbena is getting huge. We have it in a pot outside and it is really tall, it looks like a tree in a small pot:) If you haven't grown or experimented with lemon verbena, I highly recommend you try to find some. I love it! Sometimes I go outside just to smell the leaves, yes I am a nerd.

I hate letting good things go to waste so I decided to make lemon verbena blueberry scones. I chopped up the leaves really finely and added them into the scone mixture. To bring out the lemon flavor I also added lemon zest. I carefully stirred in the blueberries and baked up the scones. They were fantastic. The lemon verbena made the scones extra special.

Does anyone have lemon verbena recipes to share? If so, send them my way. I might try ice cream or sorbet next!


Lemon Verbena Blueberry Scones

(Printable Recipe)


1 large egg
3/4 cup heavy whipping cream
2 cups all-purpose flour
2 Tbs granulated sugar
1 Tbs baking powder
¼ tsp salt
5 Tbs unsalted butter, cut into small pieces and chilled

About 6 lemon verbena leaves, finely chopped

Zest of 2 large lemons

1 cup of fresh blueberries, coated with a little flour

Extra cream for brushing

Turbinado sugar


1. Center a rack in the oven and preheat the oven to 400°F. Line a baking sheet with parchment or a silicone mat.

2. Stir the egg and cream together in a small bowl.

3. Whisk the flour, baking powder, and salt together in a large bowl. In a separate bowl add the sugar, lemon zest, and lemon verbena leaves. Rub everything together with your fingers to bring out the lemon flavor. Stir in the sugar lemon mix with the flour.

4. Add the butter to the flour/lemon sugar mixture. Using your fingers, toss to coat the pieces of butter with flour. Quickly, working with your fingertips or a pastry blender, cut and rub the butter into the dry ingredients until the mixture is pebbly. You will have some little butter clumps and some larger clumps-the size of peas.

5. Pour the egg and cream over the dry ingredients and stir with a fork just until the dough, comes together. It will be sticky. Don't over mix. Still in the bowl, gently knead the dough by hand, 8 to 10 times.

6. Carefully stir in the blueberries.

7. Lightly dust a work surface with flour and turn out the dough. Divide it in half. Working with one piece at a time, pat the dough into a rough circle that’s about 5 inches in diameter, cut it into wedges or use a cookie cutter and cut out the scones. I used a round cookie cutter. Brush the scones with cream and sprinkle Turbinado sugar on top.

8. Bake the scones for 20 to 22 minutes, or until their tops are golden brown. Transfer them to a rack and cool. These are best eaten warm and on the day they are made.

Labels: , , ,

Friday, August 14, 2009

Recipe for Basil Pesto without Nuts or "Pistou"


We don't have a huge garden, but our herbs are growing like weeds. We have lemon verbena, rosemary, thai basil, and basil. My basil plants were full so I decided to make a batch of pesto to freeze.

Josh is allergic to nuts so I actually made a French "pistou," which is similar to pesto, but has no nuts. There are several variations of pistou, it usually has more garlic than basil. You can also make it with or without cheese. I wanted it to taste similar to pesto, so I just played around and made it to my taste:)

I used basil leaves, garlic, parmesan cheese, a little lemon juice, olive oil, and salt and pepper. I combined everything in my food processor and had pistou in seconds. I put the sauce in a container and put it in the freezer. Pistou and pesto freezes beautifully. I can't wait to use it on homemade pasta, pizza, or a panini! It is also good stirred into soups.


Basil Pesto without Nuts or "Pistou"


3 cups fresh basil leaves
2-3 cloves garlic
About 1/4 cup quality parmesan cheese, grated
Splash of fresh lemon juice
About 1/2 cup olive oil
Salt and pepper to taste

1. In a food processor or blender, chop up the garlic until it is minced.
2. Add in the basil and cheese and start to blend. Slowly drizzle in the olive oil while the machine is running. Blend until smooth.
3. Squeeze in a little lemon juice and add salt and pepper to taste.
4. Taste the sauce and adjust to your likings.
5. Put in a freezer container and freeze if you wish or use it right away.

Labels: ,

Wednesday, August 12, 2009

Zucchini Bread with Dried Cranberries


I have some good news to share; our blog now has its own domain name! We are a .COM! If you type in our old link you will be automatically directed to our blog, but to be safe please update your RSS feeds, bookmarks, links, etc. to: http://www.twopeasandtheirpod.com.


I also added a printer friendly button below each post. Printing our recipes is a lot easier and much better for the environment now! Thanks to all of our followers! You are the best!


It is zucchini season! We didn’t plant any this year, but luckily friends and neighbors are sharing the wealth. I am glad because I love baking with zucchini. Last week I made a loaf of zucchini bread. I played around with my old recipe-this time I used whole wheat flour, applesauce, and added in dried cranberries. I also sprinkled cinnamon sugar on the loaf before going into the oven.


I loved the finished product. The bread was very moist and the dried cranberries added a nice sweetness. The cinnamon sugar crust gave the bread a nice texture too. If you don’t know what to do with your zucchini, give this bread a try. It is excellent!


I am out of zucchini now, so if anyone wants to share, let me know:)


Zucchini Bread with Dried Cranberries


(Printable Recipe)

  • Nonstick cooking spray
  • 1 3/4 cups shredded zucchini
  • 3/4 cup packed light-brown sugar
  • 2 tablespoons granulated sugar
  • 1/3 cup canola oil
  • 1/3 cup applesauce
  • 2 teaspoons vanilla extract
  • 2 large eggs
  • 3/4 cup all-purpose flour
  • 3/4 cup whole wheat flour
  • 1/2 teaspoon baking powder
  • 1/2 teaspoon baking soda
  • 1 1/2 teaspoons ground cinnamon
  • Fresh ground nutmeg-I didn’t measure, just a bit
  • 1/8 teaspoon ground cloves
  • 3/4 teaspoon salt
  • 1/2-3/4 cup dried cranberries
  • Cinnamon/Sugar to sprinkle on top

1. Preheat oven to 350 degrees. Lightly coat a 9-by-5-by-3-inch loaf pan with cooking spray, and set aside. Grate zucchini on the large holes of a box grater (to yield 1 3/4 cups); set aside. In a large bowl, whisk together sugars, oil, applesauce, vanilla, and eggs.

2. Into a small bowl, sift together flours, baking powder, baking soda, cinnamon, nutmeg, ginger, cloves, and salt. Add flour mixture to egg mixture, and stir to combine well. Stir in grated zucchini and dried cranberries.

3. Pour batter into prepared pan, spreading evenly. Sprinkle with cinnamon/sugar mixture-if you wish. Bake until a toothpick inserted in center of loaf comes out clean, about 40-45 minutes. Cool in pan 10 minutes; invert onto a wire rack, then reinvert, top side up. Cool completely before slicing.

Labels: , ,

Monday, August 10, 2009

Recipe for Peach Almond Cake


I love Utah peaches. In my book, they are the best! They are finally ripe and ready and I can't get enough. I bought a bunch last week, but couldn't eat them fast enough so I decided to use some of them in a cake.

The peaches and almonds were wonderful together. The almonds and turbinado sugar gave the cake a nice crunchy top. The peaches kept the cake moist and delicious! If you are overloaded with peaches this summer or just want a tasty summer treat, try this cake.

I took the peach almond cake to the Julie & Julia party and everyone loved it. To read more about the movie and our Utah food blogging party read Kalyn's article over at Blogher. We really had a great time and the movie was fantastic! Meryl Streep is amazing. I hope you all get a chance to see it.


Peach Almond Cake

1 cup all-purpose flour

1/2 teaspoon baking powder

1/2 teaspoon baking soda

1/4 teaspoon salt

1/2 stick unsalted butter, softened

2/3 cup plus 1 1/2 tablespoons sugar, divided

1/2 teaspoon pure vanilla extract

1/2 teaspoon almond extract

1 large egg

1/2 cup shaken buttermilk

Peaches, chopped (about 1 1/4 cups)

Almonds, sliced or chopped almonds (about 3/4 cup)

Turbinado sugar (to sprinkle on top of cake)


Preheat oven to 400°F with rack in middle. Butter and flour a 9-inch round cake pan.

Whisk together flour, baking powder, baking soda, and salt.


Beat butter and 2/3 cup sugar with an electric mixer at medium-high speed until pale and fluffy. Beat in vanilla and almond extracts. Add egg and beat until combined.

At low speed, mix in flour mixture in 3 batches, alternating with buttermilk, beginning and ending with flour, and mixing until just combined.


Spoon batter into cake pan, smoothing top. Scatter chopped peaches evenly over top and sprinkle the almonds on top of the peaches. Top with remaining 1 1/2 Tbsp sugar and the turbinado sugar.


Bake until cake is golden and a wooden pick inserted into center comes out clean, 25 to 30 minutes. Cool in pan 10 minutes, then turn out onto a rack and cool to warm, 10 to 15 minutes more. Invert onto a plate.

Labels: , ,