Devils Workshop

has been moved to new address

http://www.devilsworkshop.org

Sorry for inconvenience...

Two Peas and Their Pod: June 2009

Tuesday, June 30, 2009

Recipe for Lemon Blueberry Buttermilk Cookies


Our summer has been really busy and I haven't had much time to bake, but last week I made time to create a special birthday treat for a friend. I was in a summery mood, so I decided to go with a lemon blueberry cookie.

I love lemon so I made sure there was plenty of zest involved. I didn't want the cookies to turn blue, so I waited to add the blueberries. I scooped the dough onto the cookie sheets and then tucked 4 to 5 berries into each cookie. After the cookies cooled, I added a lemon glaze. These cookies are light, fluffy, and lemony. The blueberries are the hidden gems in these cookies. They add a nice burst of summer.

When I made these cookies last week I posted a photo on Twitter. I had several requests for the recipe, so here you go! Your wishes are finally granted.


Lemon Blueberry Buttermilk Cookies

(Printable Recipe)


1 ½ cups unbleached all-purpose flour
Zest of two large lemons
¼ tsp. baking soda
¼ tsp. salt
6 Tbsp. (3 oz.) unsalted butter, at room temperature
¾ cup granulated sugar
1 large egg
½ tsp. vanilla extract
1/3 cup buttermilk

Fresh blueberries

Glaze:
Confectioners sugar

Fresh lemon juice

Lemon zest

Line 2 large baking sheets with parchment paper or silicone liners. I used my Silpats. Preheat the oven to 350°F.

In a medium bowl, whisk together the flour, baking soda, and salt. In a small bowl, add the sugar and lemon zest. Rub them together with your fingers until well mixed. This brings out the lemon flavor.

In the bowl of a stand mixer, beat the butter until creamy. Add the sugar/lemon mixture and beat until pale and fluffy. Add the egg, and beat well to mix. Add the vanilla, and beat on low. Mix in the flour mixture and the buttermilk in batches at low speed, beginning and ending with the flour. Scrape down the sides of the bowl with a rubber spatula as needed.

Drop the dough by level tablespoons onto the prepared baking sheets, leave about 1 ½ inches between each cookie. Tuck 4-5 blueberries into each cookie. Try to make sure they are hidden. Bake one sheet at a time for about 11 minutes. Cool the cookies on the baking sheet for 1-2 minutes; then transfer them to a wire rack.

For the glaze, whisk together the sifted confectioners sugar, lemon juice, and lemon zest. I never measure, just guess until you get the right consistency and flavor. Drizzle the glaze over the cookies.


Labels: , , ,

Monday, June 29, 2009

Our Weekend Trip To Colorado


We went to Boulder, Colorado over the weekend for Josh's cousin's wedding. We left on Thursday and got home last night. We drove and it actually wasn't that bad of a drive. I am usually not a fan of road trips, but this one wasn't too far. It only took us 7 hours and that was with a couple of stops. 

We had a great time in Colorado. We went to Boulder's Farmer's Market, Estes Park, we saw Transformers, and of course we spent lots of time with friends and family. The wedding was beautiful and we are glad we were able to celebrate with the bride and groom. 

I have today off since I work a 4/10 schedule at work. They made us take a day off this week because the 4th of July falls on a Saturday. That is fine by me. I have a lot to catch up on today.  

Here are a few photos from our trip. I will be back tomorrow with my lemon blueberry cookie recipe, I know some of you have been begging for it and I promise you will have it tomorrow:) 


Labels:

Thursday, June 25, 2009

Vegetable Panini on the Grill


We love making panini! We have a
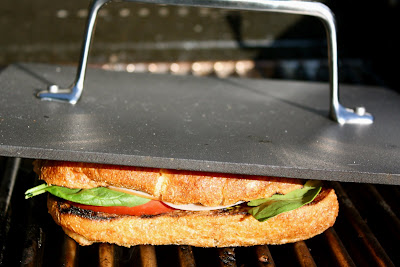
panini maker that we LOVE, but since it is summer we decided to try them on the grill. I put grilled zucchini, yellow squash, onions, roasted red pepper, artichokes, spinach, tomatoes, fresh basil and a balsamic glaze on mine. Josh loaded his with veggies, turkey, and cheese. I love customized sandwiches:)

The panini started out HUGE but we smashed them down to compact sandwiches full of flavor and goodness! I loved using the grill for our panini. Yes, they were delicious and nutritious, but the best part was eating outside in the summer sun!


Panini on the Grill

(Printable Recipe)

Whole Wheat Ciabatta Bread-we buy ours at a local bakery. You can use whatever crusty, hearty bread you like.
We brushed our bread with balsamic vinegar and grilled it briefly before putting on our panini fillings.

Grilled Veggies-we used grilled zucchini, yellow squash, and onions. I brushed them with balsamic and grilled them on both sides for a couple of minutes.

I also added roasted red peppers, artichokes, fresh spinach leaves, sliced tomatoes, and fresh basil. Josh added turkey and cheese.

Place panini directly on grill. Use a heavy pan to press down the panini. Cook for a couple minutes. Flip sandwich and press again. Cook for another couple of minutes. It's that easy!

Labels: , , , ,

Tuesday, June 23, 2009

Crispy Chocolate Oatmeal Cookies


I am always on the lookout for new cookie recipes. Awhile ago, I saw a couple of cookie recipes that used crisped rice cereal. I love cereal and cookies so why not enjoy them together?

I started with my favorite oatmeal chocolate chip recipe. I stirred in Rice Krispies and waited to hear the snap, crackle, and pop. I was a little disappointed, there was no sound coming from my cookie dough. I guess I needed to add milk, but I didn't want a soggy dough, so I pressed forward:)

The cookies baked up nicely. I really liked the added crisp from the cereal. They were a fun addition! I am glad I tried them. And since there is cereal involved go ahead and eat these for breakfast, I won't tell:)


Crispy Chocolate Oatmeal Cookies

(Printable Recipe)


½ cup brown sugar
1/2 cup white sugar
1/2 c. softened unsalted butter

1 egg
1 tsp. vanilla
1/4 tsp. Salt
1/2 tsp. Baking powder
1/2 tsp. Baking soda
1 cup flour
1 cup oats-not quick oats

1 ¼ cups Rice Krispies cereal
Chocolate chips-about 1 cup


Preheat the oven to 375 degrees. In a medium bowl, whisk together the flour, salt, baking powder, and baking soda. Combine butter and sugars in your mixing bowl. Beat until smooth. On low, add in egg and vanilla extract. Beat until combined.

Slowly add in the dry ingredients. Stir in the oats, chocolate chips, and cereal. Don't over mix. You don't want to crush the cereal too much.

Scoop dough into balls and place on a cookie sheet lined with Silpats or parchment. Bake for 10-12 minutes! Allow to cool for a minute on the cookie sheet. Move to a cooling rack and enjoy.

Labels: , ,

Saturday, June 20, 2009

Grilled Cilantro Lime Shrimp Skewers


Happy Father's Day! I hope you are all celebrating the men in your life.

I wish I could be with my dad today, but he lives far, far away. I am very close with my father, we still talk and email every day. I am a daddy's girl:) I am grateful for the sacrifices my dad has made for me and my siblings. He always puts others first and is a great example to all of us. I could go on and on about why I love and appreciate him, but I know he would be embarrassed. He is my best friend and the greatest father. Plus, he is an amazing baker, but that is just an added bonus:) We love you pops! Happy Father's Day!


We are really enjoying our grill. We use it at least once or twice a week. We bought fresh shrimp and grilled shrimp skewers. Josh made a cilantro lime marinade for the little shrimpies. They cooked up in no time. They turned pink almost immediately after we set them on the grill. You don't want to overcook shrimp, tough shrimp is not a good thing:)

We served the skewers with brown rice, black bean salsa, and a salad. This was a simple summer meal with great flavor. If you don't have a grill, you can cook the skewers inside on a grill pan, but grilling outside in the summer sun is so much better:)


Grilled Cilantro Lime Shrimp Skewers

(Printable Recipe)

Wood Skewers-you can find them at any grocery store
Shrimp-peeled and deveined
Olive oil
Fresh lime juice
Lime zest
Cilantro-chopped
Garlic-minced

1. Soak the wood skewers in water for about 10 minutes.
2. In medium bowl, mix together the olive oil, lime juice, lime zest, cilantro, and garlic. Again, we didn't measure but just guess to your taste. We didn't use much oil, maybe 1 Tablespoon.
3. Toss the shrimp in the lime/cilantro mixture. Let them marinade for about 30 minutes.
4. Put the shrimp on the wood skewers. As many as will fit.
5. On a heated grill, grill the skewers, only a few minutes for each side.
6. Serve with rice and black bean salsa, if you wish.

Labels: , , , ,

Thursday, June 18, 2009

Soba Noodles with Edamame, Zucchini, and Spinach


Every Wednesday we go to the Sunflower Market and stock up on produce. It is our date night, I know we are nerds:) Wednesday is double ad day, so everything from the week before and the new week is on sale. That means tons of cheap and delicious produce! We load our cart and usually only spend $12. It is our magic number.

Last week zucchini was on sale for 88 cents a pound, such a bargain! I loaded the cart and probably got a little carried away. I've been trying to find ways to use it before it goes bad. I made pasta with zucchini, we grilled zucchini, and I made this amazing soba noodle dish.

Have you tried soba noodles? We love them. Soba noodles are thin Japanese noodles made with buckwheat and wheat flour. They can be served hot, cold, or in soup. This time we served them warm with an Asian sauce. We added in edamame, spinach, and our star ingredient, zucchini.

We loved this dish. Soba noodles aren't heavy like some pastas can be. I loved the light Asian sauce and green vegetables too. It not only was a pretty dish, but a tasty one! I will be making this one again and again. I might even add tofu next time.


Soba Noodles with Edamame, Zucchini, and Spinach

(Printable Recipe)

Sauce:
Low sodium soy sauce
Water
Rice wine vinegar
Honey
Garlic Chile Paste

Soba noodles
1 T Sesame oil
2 cloves garlic, minced
2 zucchini, chopped
1/2 cup shelled edamame
1 cup fresh spinach leaves
3 green onions, chopped
Black pepper, to taste
Sesame seeds
Extra green onions for garnish

1. First, make the sauce. In a small bowl whisk together the ingredients. I guessed on the measurments, so just make sure you taste as you go. Sorry we forget to measure sometimes.
2. Cook the soba noodles according to the package instructions. Drain them and set aside.
3. In a large skillet heat the sesame oil. Add in garlic and cook for a couple of minutes. Add in zucchini, edamame, spinach, and green onions. Cook until the zucchini is tender and the spinach is wilted.
4. Pour in the sacue. Stir well. Add black pepper, to taste.
5. Stir in the soba noodles. Let everytihng cook together for a couple of minutes.
6. Serve in a bowl. Add sesame seeds and green onions on top, if you wish.

Labels: , , ,

Tuesday, June 16, 2009

Lemon Buttermilk Shortcakes with Berries


Thank you for all of your well wishes. We had a very happy Anniversary. Florida was our big celebration, so we just relaxed and enjoyed the day at home. Josh did surprise me with whole wheat French toast and berries for breakfast. He also bought me flowers and a card. He's really a great hubs:)

I did make Josh a special dessert to celebrate, Lemon Buttermilk Shortcakes with Berries. I found this recipe a few weeks ago on Former Chef and knew I had to save it for a special occasion.

The shortcakes were light and fluffy with a hint of lemon. I cut up strawberries and blueberries and drizzled them with agave nectar. I also added in some lemon juice and zest to bring out the lemon flavor. I let the berries sit for about an hour in the fridge so they were nice and juicy.

I cut the shortcakes in half and piled them with berries. We skipped the traditional whipped cream since we aren't huge fans. I think the fresh berries were sweet enough on their own, but Josh added a little vanilla ice cream. This is a perfect dessert for summer!


Lemon Buttermilk Shortcakes with Berries
Adapted from
Former Chef

(Printable Recipe)

2 cups flour
1 Tbsp Baking Powder
1/2 tsp. Baking Soda
2 1/2 Tbsp. Sugar
1/2 tsp. salt
5 Tbsp. Cold Butter, cut into small pieces
3/4 cup Buttermilk
Zest of one lemon
2 tsp Lemon juice
Milk, cream, or Half and Half-for brushing on shortcakes
Turbinado sugar

Strawberries
Blueberries
Agave Nectar
Extra lemon juice/zest

Prepare the berries. Cut strawberries and stir in blueberries. Drizzle berries with agave nectar, a splash of lemon juice, and a bit of lemon zest. Stir and let sit in the fridge for about an hour so the berries get juicy.

Preheat oven to 425 degrees.

Sift together dry ingredients into a large bowl. Mix in the lemon zest with a whisk.

Cut in the cold butter until it resembles dry oatmeal. Use a fork, pastry cutter, or your hands. Pour in the buttermilk and lemon juice and mix with a spoon just until the dough starts to come together. Don't over mix the dough. If it is really dry, add more buttermilk, but just a little bit. Turn dough out onto a floured surface and knead into a ball. Do this quickly and don't over knead.

Roll out the dough to about 3/4 inch thick and cut with a biscuit cutter, glass or cookie cutter. You can form the scraps into a ball and roll out again. The recipe made 7 biscuits for me.

Brush the tops of the biscuits with milk, cream, or half and half and sprinkle with Turbinado sugar.

Bake for 10-12 minutes. Serve with berries. You can add whipped cream or ice cream if you wish!

Labels: , , , ,

Sunday, June 14, 2009

One Year Anniversary and Coconut Chocolate Blondies


Today is our one year anniversary! It was a very busy year. We bought a house a month after we got married. We did a lot of traveling too. We went to California, Alaska, Illinois, Colorado, and Florida. We've also been busy with work, house projects, family, and friends. We are enjoying married life. Everything is so much better when you are with the one you love.

I don't want to get all love sappy, but I want to give Joshua a quick shout out-I love you sweetie! Happy Anniversary! Thanks for being the greatest husband! I appreciate everything you do for me. The first year as Mrs. Lichty was a dream, I am looking forward to years and years of happiness and joy with you! LOVE YOU!

Isn't he handsome????


Ok, now onto a recipe. I love bar treats. They are easy to make, travel well, and everyone loves them! When I saw these Coconut Chocolate Blondies on Brown Eyed Baker, I knew I had to try them.

They were almost too easy to make:) I whipped them up in no time! I added extra coconut before baking and I am glad I did. The coconut toasted up nicely in the oven and added great flavor to the bars. The bars are loaded with chocolate and coconut and VERY rich! They didn't last long though, our friends kept coming back for more!

If you need an easy treat, try these. They are perfect for traveling, picnics, and pure indulgence!


Coconut Chocolate Chunk Blondies

Source: Brown Eyed Baker

(Printable Recipe)


1 cup all-purpose flour
1/8 teaspoon salt
4 ounces unsalted butter, melted and cooled to room temperature
1 cup light brown sugar
1 large egg
1½ teaspoons vanilla extract
1 cup sweetened flaked coconut
1 cup chocolate chips or chunks

More Coconut-for sprinkling on the top of the bars.


1. Preheat oven to 350°F. Spray an 8-inch square baking pan with cooking spray.

2. Combine the flour and salt; whisk and set to the side.

3. Stir together the melted butter and brown sugar until smooth and creamy; beat in egg and vanilla extract until well blended.

4. Slowly beat in the flour and salt mixture until just blended. Next, stir in the coconut and chocolate chips. Scrape the batter into the pan. Make sure the batter is spread evenly, smooth with a spatula. Sprinkle extra coconut on top of the bars.

5. Bake for 25-30 minutes, or until set in the center but still soft. Do not overbake the bars. Let cool slightly before serving. Cut the bars into squares.

Labels: , ,

Friday, June 12, 2009

Recipe for Blueberry Buckwheat Pancakes


Happy Friday! I am so glad my weekend has already started. It was a busy week at work for me. I work for Healthy Utah, the worksite wellness program for the state. Every year we have a conference for our wellness council members. The conference was yesterday and it went really well. We had speakers address nutrition and physical activity at work, tobacco free worksites, and we also launched a new "Work Well" Challenge. It was a lot of work, but everything went well. I am still glad it is over though:)

The other night we made breakfast for dinner. We do this a lot because we rarely have time to make anything fancy or special in the morning. I usually just eat my oatmeal at my desk. I've been wanting to try buckwheat flour for awhile, so we made Blueberry Buckwheat Pancakes.

Buckwheat flour has a rich, nutty flavor and is high in protein and fiber. It is also gluten free. We mixed the buckwheat flour with whole wheat flour. I loved the texture and flavor of these pancakes. They were wholesome and filling. We added in fresh blueberries which really made these pancakes special.

If you are looking for a new healthy breakfast or even dinner option, try these pancakes! This batch made enough for about six people. We had extras, so we put some in the freezer to reheat on busy mornings! Enjoy and have a great weekend!


Blueberry Buckwheat Pancakes
Adapted from Ellie Krieger

(Printable Recipe)

1 cup buckwheat flour
3/4 whole wheat flour
1 1/2 tsp. baking powder
1/2 tsp. baking soda
1/4 tsp. salt
1/2 tsp. cinnamon
1 cup low-fat buttermilk
3/4 cup skim milk
1 T honey
2 eggs
2 T. sugar
1 T. canola oil
1 tsp. vanilla extract
1 cup of fresh blueberries
Extra blueberries and fruit for serving (optional)
Powdered sugar
Maple Syrup

In a large bowl whisk together the flours, baking powder, baking soda, salt, and cinnamon. In another bowl, beat together the buttermilk, non-fat milk, honey, eggs, sugar, oil, and vanilla. Stir the wet ingredients into the dry ingredients, mixing only enough to combine them. Stir in berries.

Preheat a large nonstick griddle. You can use a skillet if you don't have a griddle. Ladle the batter onto the hot griddle or skillet , use about a 1/4 cup batter. Flip the pancake when it is golden brown on the bottom and there are lots of bubbles. Don't flip them too soon. Cook the other side until golden brown. Serve hot with syrup and extra fruit, if you wish!

Labels: , , ,

Tuesday, June 09, 2009

Almond Toffee Chocolate Chip Oatmeal Cookies


It was nice having a break from cooking and baking while we were in Palm Beach. Our room did have a full kitchen, which was nice so we didn't have to eat out all of the time. We didn't do any major cooking though. By the end of the week I was itching to get back to my kitchen. I missed my appliances, gadgets, and oven.

After unpacking, cleaning, doing laundry, I baked cookies. Our friends were visiting from California and I wanted to make them an extra special treat. I took my chances and made up a new cookie recipe. I wanted to create a cookie with all of my favorite things: almonds, toffee, chocolate chips, and oatmeal.

I started with a basic chocolate chip oatmeal cookie base. I then added in almond extract, chopped almonds, chopped Heath bars, and chocolate chips. The cookies were loaded with goodies!

I know I baked these cookies for our friends, but of course I had to sample them, just to make sure they were safe and good enough to handout:) One bite and I was in heaven! These are my new favorite cookie! I LOVED them! The toffee melted throughout the oatmeal cookie. The almond bits and chocolate chips bulked up the cookies in the most perfect way.

I am glad I wrapped these cookies up and gave them away. I know if they were sitting on the counter I would not be able to resist. They are that good!


Almond Toffee Chocolate Chip Oatmeal Cookies

(Printable Recipe)


½ c. brown sugar
1/2 c. white sugar
1/2 cup softened unsalted butter

1 egg
1 tsp. vanilla
1/4 tsp. almond extract
1/4 tsp. Salt
1/2 tsp. Baking powder
1/2 tsp. Baking soda
1 1/4 c. flour
1 1/4 c. oats-not quick oats
Chocolate chips-3/4 cup

2 Heath bars-chopped

Almonds, chopped-about ¾ cup

Preheat the oven to 375 degrees. In a medium bowl, whisk together the dry ingredients. Combine butter and sugar in your mixing bowl. Beat until smooth. On low, add in egg, vanilla, and almond extract. Beat until combined.

Slowly add in the dry ingredients. Stir in the oats, chocolate chips, Heath, and almonds. The dough should be nice and thick, with chunks of goodness

Scoop dough into balls and place on a cookie sheet lined with Silpats or parchment. Bake for 10-12 minutes! Allow to cool for a minute on the cookie sheet. Move to a cooling rack and indulge!

Labels: , , , ,

Monday, June 08, 2009

Stuffed Shells with Ricotta, Spinach, and Portobello Mushrooms


I never get sick of Italian food. Sometimes I think I am Italian, my name is Maria, I have dark hair, I could pass, right? :) I love pasta, pizza, gelato, panini, etc. Italian food always hits the spot for me.

I recently made stuffed shells for dinner. I started with the classic ricotta spinach mixture. I also added in portobello mushrooms, onion, garlic, and red peppers. I made a homemade marinara sauce and topped the shells off with cheese.

I loved peeking in on the bubbling shells that were oozing with cheese. The house smelled amazing too. I am glad I added in the extra vegetables, the portobello mushrooms and red peppers worked well with the spinach and cheese.

I think this is a great dish to serve to guests. You can prepare the filling and stuff the shells in advance. Keep the stuffed shells covered in the refrigerator until you are ready for dinner. Bake them 35 minutes before the guests arrive and you will have an amazing dinner with no last minute hassles.


Stuffed Shells with Ricotta, Spinach, and Portobello Mushrooms

(Printable Recipe)

1 T olive oil

1 large portobello mushroom, chopped

1/2 onion, diced

3 cloves garlic, minced

1 red pepper, diced

1 15 oz ricotta cheese - I used low fat

1 egg

3/4 cup mozzarella cheese, shredded (divided)

1/2 cup Parmesan cheese, grated (divided)

1/2 cup frozen spinach, thawed, drained, and chopped (use a potato ricer to get rid of the water)

1/2 tsp dried basil

Dash of crushed red pepper

Salt and pepper

About 3 cups of marinara sauce (I made my own, you can use store bought)

About 18 jumbo pasta shells, cooked al dente, read box instructions:)


Preheat the oven to 350 degrees. Spray a large casserole dish or Pyrex 9 by 13 pan with cooking spray. Heat the olive oil in a large skillet. Once hot, add the onion, cook until soft. Add in garlic, mushrooms, and red peppers. Remove from heat and cool.

In a large bowl combine the ricotta, 1/4 cup of the mozzarella, 1/4 cup of the Parmesan, stir well. Add in the egg, spinach, dried basil, crushed red pepper,salt and fresh cracked pepper to taste. Mix well until creamy. Add the mushroom, onion, red pepper mixture.

Pour 1/2 cup of marinara sauce in the bottom of your sprayed baking dish. Place the cooked shells in the pan. Make sure they are spaced out evenly. Stuff each shell with cheese/veggie mixture. Use a spoon, it might get messy:)

Pour the remaining sauce over the stuffed shells. Add the leftover mozzarella and Parmesan.

Cover with foil and bake for 30 minutes. Remove the foil and bake for an additional 5 minutes. You want the shells to be bubbling with goodness. Let cool for a few minutes and serve warm.

Labels: , ,

Friday, June 05, 2009

Palm Beach Florida


We are back from sunny Palm Beach Florida. We really had a great vacation. The week went fast, but we were able to squeeze in loads of fun and a lot of rest and relaxation. I know this is a food blog, but I am going to share some of my vacation photos anyways. Sorry if I bore you! 

We stayed in West Palm Beach at the Ocean Pointe Marriott Resort. It was fantastic! Our room had a full kitchen, living area, king bed, jacuzzi, etc. There was also a nice fitness center, 4 pools, hot tubs, and great access to the ocean. 


Taking in the Florida sun! We were spoiled with perfect weather, minus the humidity:) 


Enjoying the Atlantic Ocean! 

We visited a Wild Life Sanctuary. We watched the alligators and turtles eat dinner. Dead rats and chickens. Kind of gross, but fun to watch! 

Pretty Bird!! 

Our late night stroll on the beach. Yes, Josh wore his head lamp:)


We drove into Miami one afternoon. We visited the beach and walked around. It's an interesting city! 

More beach time. I was too chicken to get in, but Josh enjoyed the water. 


We went to Delray Beach one evening. Very nice beach and area. 


We stopped and took pictures at a Lighthouse. 


We really enjoyed our time in Palm Beach. Thanks to Ben and Whitney for coming with us. It was a lot of fun. Florida, we miss you, but it is nice to be home! I will be back with something tasty soon!

Labels:

Thursday, June 04, 2009

Chocolate Peanut Butter Brownies


Today is our last day of vacation in Palm Beach, sad! The week flew by! We've had a great time. I will do a trip post soon, but today I want to share my chocolate peanut butter brownie wedges. I made these on Memorial Day and they were a crowd pleaser.

Fudgy brownies are one of my favorite treats. I made my basic brownie recipe and added in chopped up Reese's peanut butter cups. I also swirled in peanut butter with a toothpick. I wanted these to be extra peanut buttery!

The brownies were gooey, fudgy, and loaded with peanut butter goodness. I cut the brownies in wedges and served them with a mini peanut butter cup on top! If you are a sucker for chocolate and peanut butter, you will adore these brownies. I know I will be baking them again!


Chocolate Peanut Butter Brownies


(Printable Recipe)

3/4 cup all-purpose flour

3/4 cup granulated sugar
1/3 cup bittersweet chocolate, (2 ounces) coarsely chopped
1/2 cup unsweetened cocoa powder, sifted
1/4 tsp baking powder

1/4 tsp table salt
1/3 cup canola oil
2 large eggs
1/2 tsp vanilla extract
Reese's peanut butter cups, chopped (I didn't measure, add what you want)
Peanut butter-I used creamy, about a 1/3 of a cup

Position an oven rack on the middle rung. Heat oven to 350 degrees. Lightly grease the bottom and sides of a 9-inch round cake or pie pan.

In a medium bowl, sift together the flour, sugar, cocoa powder, baking powder, and salt. Add in the chocolate chunks. Whisk until blended.
In a separate bowl, mix together the oil, eggs, and extract with a fork until just blended.
Pour the liquid over the flour mixture and mix with a rubber spatula until just blended. The batter will be kind of dry, don’t worry. Add in the peanut butter cups and stir until combined.

Scrape the mixture in to the pan and spread evenly. You might have to press the mixture in to the sides if you are having trouble spreading with a spatula. Swirl in the peanut butter with a toothpick or knife.

Bake for 25 minutes or until a toothpick or cake tester inserted in to the center comes out with only a few gooey pieces clinging to it. Transfer the baking dish to a cooling rack and let cool. Cut into wedges. Add a mini peanut butter cup on top, if you wish!

Labels: , , ,